在uni-app中使用微信登录总结
最近开发了一款使用uni-app框架的小程序,名字叫“花果鲜inside”(因为是针对公司业务的小程序,注册后需要后台审核,所以只能游客浏览哈)。现将开发问题中涉及到的微信授权登录业务总结一下.
登录流程
首先,我们先上小程序登录的官方示例图:
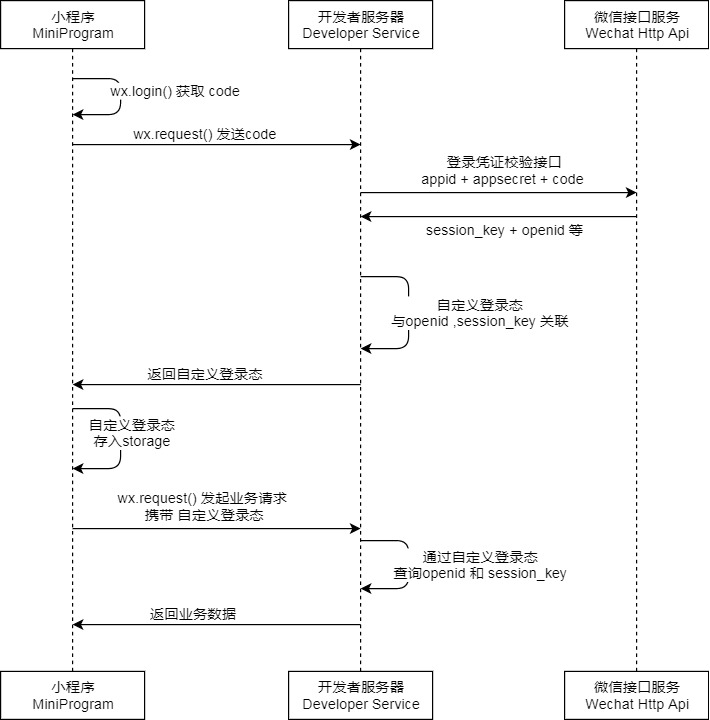
如果你看起这个登录时序图有些懵逼,那么就看我结合业务的实现吧。
登录业务实现
散配小程序从管家APP中剥离出购物车、订单和我的三个模块。三个模块均设有登录入口。用户启动小程序,从login.vue中触发登录逻辑(部分代码):
onLoad(e) {
        tip.showLoading()
        if (e !== {} && e.autoLogin ===  'false') {
            //用户点击登录按钮,触发的onload,需要展示登录页面
            this.authorizationLogin()
        } else {
            // 小程序启动的业务处理入口
            const storageUserInfo = tool.getUserInfo()
            if (storageUserInfo) {
                const res = JSON.parse(storageUserInfo)
                this.setLoginData(res)
                this.$config.open_id = res.open_id
            } else {
                tip.hideLoading()
                this.$store.commit('setLoginStatus', false)
                this.$router.switchTab('/pages/order/order')
            }
        }

    },
考虑到存在用户从不同页面触发login.vue的onload和小程序启动时调用onload两种情况,使用autoLogin来做区别。
用户如果通过点击事件触发,则需要这样传参:
this.$router.push('/pages/login/login', { autoLogin: false })启动小程序登录场景
判断本地是否存储有用户的信息,有的话则会在setLoginData方法中配置全局config对象,并在该方法中请求token。注意,token对后台而言是区分用户是否处于登录的唯一标识。获取成功后,则跳转到首页,完成登录业务流程。
如果本地没有存储有用户的信息,则直接跳转到首页。如果需要登录,则需要用户后续通过主动点击模块的登录按钮来触发登录业务。
用户点击登录按钮
用户从三个模块点击登录时,会 调用login.vue的onload中的authorizationLogin方法,通过authorizationLogin来实现登录业务。
首先,我们去获取用户信息,我采取的是先调用uni.login,后通过uni.getSetting来判断用户是否权限的方式。当然,你也可以先通过uni.getSetting判断权限后调用uni.login。
        authorizationLogin() {
            uni.login({
                provider: 'weixin',
                success: res => {
                    this.code = res.code
                    uni.getSetting({
                        success: (result) => {
                            tip.hideLoading()
                            if (result.authSetting['scope.userInfo']) {
                                this.getWxUserInfo()
                            } else {
                                this.needAuth = true
                            }
                        },
                        fail: () => {
                            this.needAuth = true
                        }
                    })
                }
            })
        },
由于拉取用户信息需要用户授权,并且只能通过button来触发获取,所以需要通过
uni.getSetting来判断。
授权按钮:
<button open-type="getUserInfo" @getuserinfo="getuserinfoCallback" class="auth" v-if="needAuth">授权登录</button>正常场景,拿到用户信息,调用readyWxAuth方法,该方法会请求自己后台的接口:
        // 后台做判断
        readyWxAuth(res) {
            this.$api
                .readyWxAuth({
                    code: this.code,
                    userInfo: JSON.stringify(res.userInfo)
                })
                .then(res => {
                    tip.hideLoading()
                    this.open_id = res.open_id
                    this.$config.open_id = res.open_id
                    if (res.user_info === undefined) {
                        //说明是新的用户,弹出登录框,绑定用户
                        this.canAutoLogin = false
                    } else {
                        //不是新用户,存储用户信息,设置全局变量
                        tool.saveUserInfo(res)
                        this.setLoginData(res)
                    }
                })
        }
需要将我们通过uni.login拿到的code和通过用户授权的信息传给自己的后台,后台判断该用户是否为新用户,是新用户(res.user_info === undefined)的话,执行注册相关的逻辑,注册成功,则后续可以执行登录操作。不是的话,将后台返回的信息存储到本地,设置全局信息config,完成登录业务。
如果你看的不是很明白,那么我就将登录页面代码给大家粘贴出来:
<template>
    <view class="container">
        <div class="login_page" v-if="!canAutoLogin">
            <view class="content">
                <view class="item">
                    <text class="title">账号</text>
                    <input class="input" type="text" placeholder="请输入账号" v-model="account" />
                </view>
                <view class="item">
                    <text class="title">密码</text>
                    <input class="input" type="text" password placeholder="请输入密码" v-model="password" />
                </view>
            </view>
            <view class="login" @click="login">登录</view>
            <view class="option">
                <navigator class="change-password" url="/pages/login/register">注册</navigator>
                <navigator class="change-password" url="/pages/login/changePassword">忘记密码?</navigator>
            </view>
            <view class="version">当前版本:{{ version }}</view>
        </div>
        <button open-type="getUserInfo" @getuserinfo="getuserinfoCallback" class="auth" v-if="needAuth">授权登录</button>
    </view>
</template>

<script>
import tip from '../../util/tips.js'
import tool from '../../util/tool.js'
import md5 from '../../util/md5.min.js'
import { RECENT_SELECTED_STORE } from '../../util/storage.js'
export default {
    data() {
        return {
            account: '',
            password: '',
            version: '',
            open_id: '',
            code: '',
            canAutoLogin: true, // wx启动后,检测能否自动登录(默认可以),如果不能自动登录,则需要显示展示订货首页
            needAuth: false //如果登录过期,则需要置为true,显示授权登录按钮
        }
    },
    onLoad(e) {
        this.$config.needRefresh = true
        tip.showLoading()
        if (e !== {} && e.autoLogin ===  'false') {
            //用户点击登录按钮,触发的onload,需要展示登录页面
            this.authorizationLogin()
        } else {
            // 小程序启动的业务处理入口
            const storageUserInfo = tool.getUserInfo()
            if (storageUserInfo) {
                const res = JSON.parse(storageUserInfo)
                this.setLoginData(res)
                this.$config.open_id = res.open_id
            } else {
                tip.hideLoading()
                this.$store.commit('setLoginStatus', false)
                this.$router.switchTab('/pages/order/order')
            }
        }

    },
    methods: {
        getuserinfoCallback(e) {
            this.needAuth = false
            if (e.detail.userInfo === undefined) { //授权拒绝
                this.needAuth = true
            } else {
                this.readyWxAuth(e.detail)
            }
        },
        authorizationLogin() {
            uni.login({
                provider: 'weixin',
                success: res => {
                    this.code = res.code
                    uni.getSetting({
                        success: (result) => {
                            tip.hideLoading()
                            //判断是否有权限去直接拉取用户信息
                            if (result.authSetting['scope.userInfo']) {
                                this.getWxUserInfo()
                            } else {
                            //没有权限,则需要显示一个固定格式的button,点击让用户授权
                                this.needAuth = true
                            }
                        },
                        fail: () => {
                            this.needAuth = true
                        }
                    })
                }
            })
        },
        getWxUserInfo() {
            tip.showLoading()
            this.needAuth = false
            //获取用户信息
            uni.getUserInfo({
                provider: 'weixin',
                withCredentials: true,
                success: res => {
                    this.readyWxAuth(res)
                },
                fail: error => {
                    tip.hideLoading()
                }
            })
        },
        // 此时,才涉及到你与自己后台的交互判断
        readyWxAuth(res) {
            this.$api
                .readyWxAuth({
                    code: this.code,
                    userInfo: JSON.stringify(res.userInfo)
                })
                .then(res => {
                    tip.hideLoading()
                    this.open_id = res.open_id
                    this.$config.open_id = res.open_id
                    if (res.user_info === undefined) {
                        //说明是新的用户,弹出登录框,绑定用户
                        this.canAutoLogin = false
                    } else {
                        //不是新用户,存储用户信息,设置全局变量
                        tool.saveUserInfo(res)
                        this.setLoginData(res)
                    }
                })
        },
        setLoginData(res) {
            const userInfo = res.user_info
            const store = res.store
            this.$config.store_name = store.name
            this.$config.wxHeadImage = userInfo.wxInfo.avatarUrl
            this.$config.sign = res.sign
            this._setStoreInfo(store)
            this.$config.staff_role_gid = userInfo.FK_role_gid
            this.$config.staff_name = userInfo.username
            this.getToken(userInfo.gid, this.$config.store_gid, res.sign)
        },
        login() {
            if (this.account === '') {
                tip.showToast('账号不能为空')
                return
            }
            if (this.password === '') {
                tip.showToast('密码不能为空')
                return
            }
            this.$api
                .login({
                    number: this.account,
                    password: md5(this.password),
                    open_id: this.open_id,
                    isLoading: true
                })
                .then(res => {
                    res.user_info.self_login_password = md5(this.password)
                    res.open_id = this.$config.open_id
                    //登录拿到的res中不包含open_id,所以需要自己手动存进res
                    tool.saveUserInfo(res)
                    this.setLoginData(res)
                })
                .catch(err => {
                    tip.showModal(err, false)
                })
        },
        getToken(staff_gid, store_gid, sign) {
            let data = {
                FK_staff_gid: staff_gid,
                FK_store_gid: store_gid,
                sign: sign
            }
            // 保存用户gid
            this.$config.staff_gid = staff_gid
            this.$api
                .getToken(data)
                .then(res => {
                    // 保存token
                    this.$config.token = 'Bearer ' + res
                    tip.hideLoading()
                    this.$store.commit('setLoginStatus', true)
                    this.$config.needRefresh = true
                    this.$router.switchTab('/pages/order/order')
                })
                .catch(err => {
                    tip.hideLoading()
                    tip.showToast(err)
                    this.clearUserInfo()
                })
        },
        clearUserInfo() {
            this.$store.commit('setLoginStatus', false)
            tool.removeProductCache()
            this.$store.commit('initProduct', [])
            tool.delUserInfo()
            this.$config.store_name = ''
            this.$config.sign = ''
            this.$config.staff_role_gid = ''
            this.$config.token = ''
            this.$config.authArray = []
            this.needAuth = true
            this.$config.needRefresh = true
        },
        // 设置门店信息
        _setStoreInfo(store) {
            const recent_selected_store = tool.getStorageSync(RECENT_SELECTED_STORE)
            if (recent_selected_store) {
                let tempStore = recent_selected_store[0]
                if (tempStore.FK_branch_type_gid) {
                    store = tempStore
                }
            }
            this.$config.store_name = store.name
            this.$config.store_gid = store.gid
            this.$config.store_branch_gid = store.FK_branch_type_gid
        }
    }
}
</script>
总结:登录页面比较简单,思路也比较固定。小程序启动后,先判断是否存储有用户信息,有的话就直接登录;没有的话就需要小程序来登录了。使用小程序登录,需要先判断用户有没有授权让你获取用户信息,有的话去拉取用户信息,然后与自己的后台做交互。